The hardware keyboard of some devices must be customized if some keys don’t work correctly.
You can use the “Hardware keyboard info” option at Test Menu option (at the top of the screen of Profiles or Process screen)
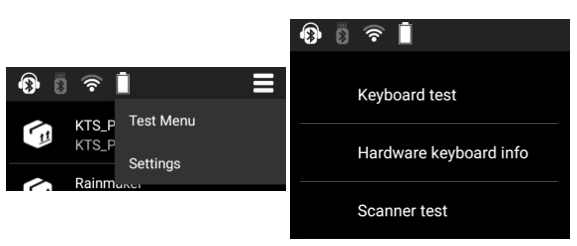
This utility will help you to configure the _tnx_charMaps.jcf configuration file if necessary.
This file has the following structure for each “customized” keyboard:
- Model and DeviceType: identifies the model of the device. Some of these models have different keypads and these need to be identified to.
- Maker: identifies the manufacturer of the device.
- 3LetterKey: parameters applied to devices with T9 keyboard.
- SpecialKeys: contains each scan code corresponding to special diacritic keys (such as blue or yellow keys, alt, shift, ctrl, etc)
- Filters: contains a list of specified keys with special functionality or even if some of the hardware keys are ignored.
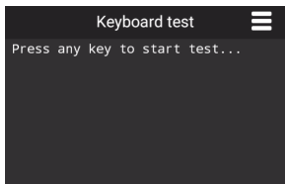
Keyboard test and _tnx_charMaps.jcf
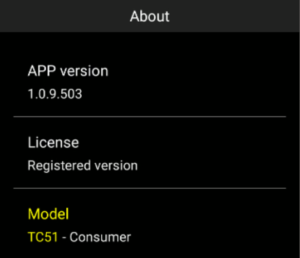
Model
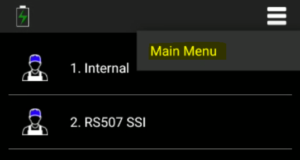
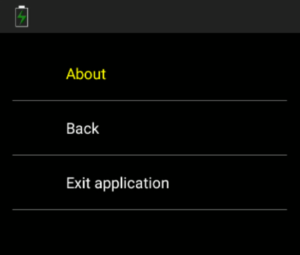
The device model is identified in the Main Menu (right top of the profiles screen), About option:
 |
 |
|
 |
Peculiarities
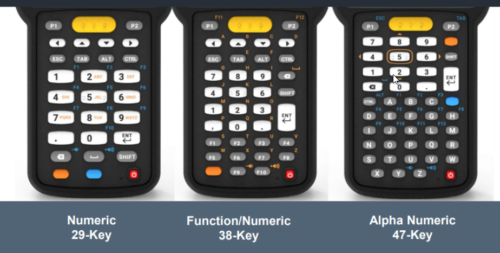
We must differentiate between the models of MC33 devices:
In _tnx_charMaps.jcf we must add some difference in the Model name parameter depending on the keypad we are using and use the Description parameter to define it. For example:
  "model": "MC33",
  "deviceType": "7",
  "maker": "Zebra",
  "description": "MC33 device with ABC, DEF keys.",
....
  "model": "MC33",
  "deviceType": "6",
  "maker": "Zebra",
  "description": "MC33 device with a complete keyboard",
You can obtain the value of the “deviceType” depending on the Manufacturer:
For Zebra devices (such as MC33):
adb shell getprop ro.config.device.keyboard
- For the 29 keypad device, the command will return “7”
- For the 38 keypad device, it will return “6”
- For the 47 keypad device, it will return “5”
For Honeywell devices (such as CK65):
adb shell getprop ro.hon.plat.keypad
- For the 51-key alphanumeric device, the command will return “qwerty”
- For the 38-key numeric keypad, it will return “numeric”
NOTE:
Please, indicate the value “0” for those Zebra devices which no device type is specified.
"deviceType": "0"
3LetterKey parameters
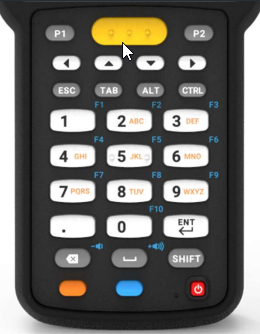
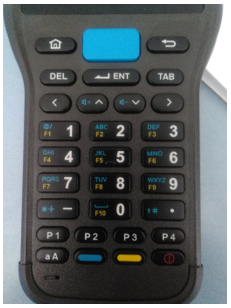
Some devices like Zebra MC33 or Honeywell EDA60K has a T9 keyboard (29 keys):
 |
 |
We use the following parameters:
  "3LetterKeyDelay": 1500,
  "3LetterKeyDevices": null,
  "3LetterKeyBSFix": false,
To use this kind of keypads, we use the “3LetterKeyDelay” to wait for the correct character pressed to be displayed.
In case of the device inserts a backspace between each character pressed, such as EDA60K, we must set the “3LetterKeyBSFix” parameter to TRUE. This will ignore all the backspace characters sent until the “3LetterKeyDelay” time is got.
Use the “3LetterKeyDevices” if the Device IDs change in the use of some specific keys.
Peculiarities
MC33 29-keys requires to activate the Cap Locks key (press Shift key twice) to display every character in the key in capital letters. Otherwise, only the first letter in the key will be displayed in a capital letter, not the following ones.
Special Keys
Special keys will be ignored because they are diacritic keys for performing a complete action. If you want, you could add any kind of key you need to be ignored.
All the keys specified in this section will be displayed in the log file.
Some examples of special keys we can find in these devices are the blue and yellow keys for activating alpha mode or function keys, the CTRL key, the SHIFT key, etc.
These keys must be identified at this parameter “specialKeys” for each device. You can use the Keyboard hardware info, as we mentioned, to fill in the values for each field.
For example, if we press the BLUE key at keyboard test, we obtain the following result:
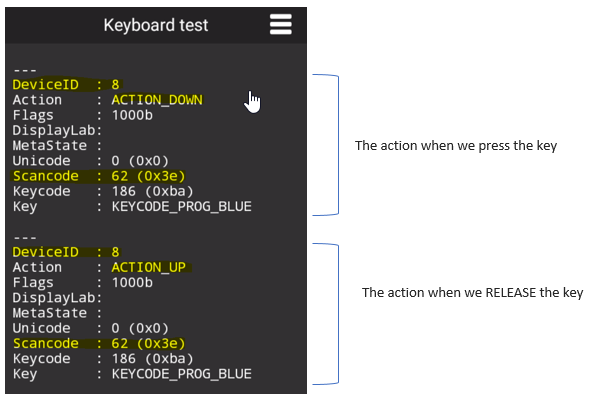
To configure our customized _tnx_charMap.jcf file we must pay attention at binomials ACTION_DOWN – ACTION_UP. None of an ACTION_UP is valid without an ACTION_DOWN.
So, for the BLUE key at THIS device, we must configure the DeviceID and the ScanCode data.
"specialKeys": [
  {
    "label": "blue",
    "deviceId": 8,
    "scanCode": 62,
    "icon": {
        "on": true,
        "color": "#0000ff",
        "toggleMode": false,
        "toggleModeDouble": false,
        "toggleIgnoreScanCodeMap": [],
        "onWhenKeyCodeMap": [ 24, 25, 55, 62, 70 ],
        "onWhenScanCodeMap": [],
        "onWhenSequenceMap": [{
            "code": "key",
            "description": "Android keys",
            "from": 29,
            "to": 54
        }]
    }
  }
],
New params from TellNext v1.0.17.503
-
- The “scanCode” parameter has been deprecated. Though it is still valid for backwards compatibility. For new keyboards, use the default value 0. Use the new parameters “keyCodes: []” and “scanCodes: []” to indicate the keycodes or scancodes to check. Value -1 means that any keycode/scancode is valid.
- The “mode“ parameter has also been added in this version. This parameter indicates the Keyboard operating mode. The LegacyMode is the normal treatment of the keyboards.
Icons parameter
Some specific icons are displayed for the user to identify which special keys are active or not. The icon parameter is used in the following way:
-
-
- on: whether to show the icon or not for the defined special key
- color: the color code you want to display in the CommandBar. Hex format.
- display: indicates which icons will be displayed. For example, you have SHIFT and CAPS LOCK. You don’t want to show an icon when pressing SHIFT, but you want an icon when you press CAPS LOCK. Use the value “ShowDouble” to display the maintained CAPS LOCK icon, instead of the temporary icon (SHIFT = “ShowSingle”). The value “ShowBoth” will show both icons.
- toggleMode: if true, the icon will only be visible until another key is pressed.
- toggleModeDouble: If the same key was pressed twice, the mode will be permanent and not de-activated until the user presses this key again. This parameter can only be active together with ‘toggleMode’ set to true.
- toggleIgnoreScanCodeMap: Scan codes to ignore while the key is active. If any of these keys are found, the toggle will be canceled and the state will stay the same as before (i.e. the state doesn’t change). Use when ‘toggleMode’ is true.
- onWhenKeyCodeMap, onWhenScanCodeMap, onWhenSequenceMap: activate the icon when the keycodes, scancodes or sequence indicated are pressed
-
NOTES:
-
-
- Use the specific labels in the config file for Shift, Ctrl and Alt keys.
-
"specialKeys": [
  {
    "label": "shift", / "label": "ctrl", / "label": "alt", / "label": "numlock",
A specific icon will be displayed in the upper bar of the screen in the following way:
![]()
In case the “label” parameter is not correctly written, the icon for the special key will be the color set in the “icon.color” parameter.
-
-
- View Annex for the detailed function of the Hardware test at TellNext.
-
Filters
At the “Filters” section, we can block some other keys using simple arrays or a range of keycodes/scancodes.
An example of this:
-
-
- For all keyboards (deviceId), the key with Keycode 59 and the key with ScanCode 59 are ignored
- For keyboard 9 (deviceId), the keys with ScanCodes between 0 and 100 (both included) are ignored
-
"filters": [
  {
    "deviceId": "",
    "android2Unicode": true,
    "blockKeyCodeMap": [ 59 ],
    "blockScanCodeMap": [ 59 ],
    "convert": [],
    "blockSequenceMap": []
  },
  {
    "deviceId": "9",
    "android2Unicode": true,
    "blockKeyCodeMap": [],
    "blockScanCodeMap": [],
    "convert": [],
    "blockSequenceMap": [
      {
        "code": "scan",
        "from": 0,
        "to": 100
      }
    ]
  }
]
“android2Unicode”: converts an Android keycode into a standard Unicode keycode. Set always as true.
Peculiarities
In some cases, we might need to remap some keys. See the example to remap some function keys at Honeywell CK75:
"convert": [
  {
    "label": "f13",
    "scanCode": 183,
    "internalCommand": "200D"
  },
  {
    "label": "f14",
    "scanCode": 184,
    "internalCommand": "200E"
  }
In MC33 with 29-key keyboard, there could be a problem with the ENTER key, because it has the same scanCode as the “S” key. To solve this issue we must configure the keycode for processing this key. The corresponding keycode is displayed by the Hardware Keyboard Info menu option.
"convert": [
  {
    "label": "enter",
    "keyCode": 66,
    "scanCode": 28,
    "internalCommand": "d"
  }
New params from TellNext v1.0.17.503
We can use some combinations of keys, so we need also a remapping of these keys. See the use of the new inMetaState and outMetaState parameters to understand how they work:
- inMetaState: meta key that should be active for the key to be converted.
- outMetaState: lets you change the meta state. Used for special combinations.
See the examples in the TellNext_hardware_keyboard documentation
- Annex about controlling hardware keyboard
- Using external keyboards